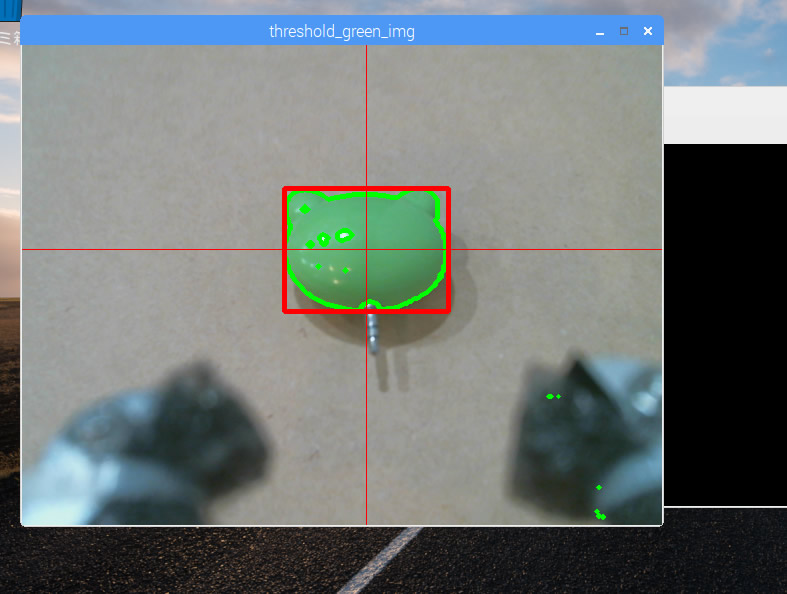
Raspberry pi でロボットアームを動かす その5 ウェブカメラと画像解析
アームの先端にWEBカメラを付けて、認識させてみる
まず、動作確認その他めのために、Displayを取得したい。
X11VNC でリモートデスクトップ
最初 xrdp でリモートデスクトップ接続していたのですが、Xlib: extension “RANDR” missing on display “:1.0” とでて、対処の仕方がわからなかったので、X11VNC に切り替えました。
画面に出ている映像を取得する感じなので、自動で xwindow まで到達させておきます。
/etc/lightdm/lightdm.conf で、ログインさせておきたいユーザーを指定。
解像度指定
/boot/config.txt frambebuffer の2行。
$ sudo apt-get install x11vnc
$ x11vnc
ポートが出るので、わかりますが、初回なら 5900 でしょう。
一旦切断?した後、再度接続する際には、
$ x11vnc
します。
x11vnc 自動起動
cat .config/autostart/x11vnc.desktop
[Desktop Entry]
Encoding=UTF-8
Type=Application
Name=X11VNC
Comment=X11VNC
Exec=x11vnc
StartupNortify=false
Terminal=false
Hidden=false
opencv のインストール
$ sudo apt-get install libopencv-dev
$ sudo apt-get install python-opencv
opencv のテスト
適当な画像を読み込んで、処理して、x-window に window を出すテストを行う。
realvnc などで、接続しておく。
RBG を HSV に変換 & 2値化
境界線の抽出
OpenCV: Contours : Getting Started
コーディング
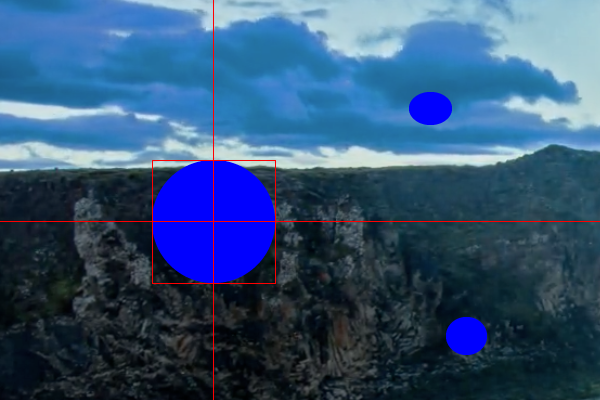
contour が複数ある際にどうするかですが、今回は単純に一番大きな四角だけを拾うようにしました。
#!/usr/bin/env python
# -*- coding: utf-8 -*
import sys
import cv2
import numpy as np
import pprint as pp

def main():
        image = cv2.imread('001.png')
        cv2.namedWindow("original");
        cv2.moveWindow("original", 10, 50);
        cv2.imshow('original', image)
        cv2.waitKey(0)
        cv2.destroyAllWindows()

        image_hsv = cv2.cvtColor(image, cv2.COLOR_BGR2HSV)      # HSV, range of Hue is 0-180
        #image_hsv = cv2.cvtColor(image, cv2.COLOR_BGR2HSV_FULL)        # HSV_FULL, range of Hue is 0-360
#       pp.pprint(image_hsv)

        h = image_hsv[:, :, 0]
        s = image_hsv[:, :, 1]
        v = image_hsv[:, :, 2]

        width   = h[0,:].size
        height  = h[:,0].size
        print( 'width %s, height %s' % (width, height) )

        blue_min = np.array([110, 100, 100], np.uint8)
        blue_max = np.array([140, 255, 255], np.uint8)
        threshold_blue_img = cv2.inRange(image_hsv, blue_min, blue_max)

        cv2.namedWindow("threshold_blue_img");
        cv2.moveWindow("threshold_blue_img", 10, 50);
        cv2.imshow('threshold_blue_img', threshold_blue_img)
#       cv2.imwrite("threshold_blue_img.png", threshold_blue_img);
        cv2.waitKey(0)
        cv2.destroyAllWindows()

#       pp.pprint(threshold_blue_img)
        contours,hierarchy = cv2.findContours(threshold_blue_img,cv2.RETR_TREE,cv2.CHAIN_APPROX_SIMPLE)
#       pp.pprint(contours)

        cv2.namedWindow("contours");
        cv2.moveWindow("contours", 10, 50);
        cv2.drawContours(image, contours,-1,(0,255,0),3)
        cv2.imshow('contours', image)
#       cv2.imwrite("contours.png", image);
        cv2.waitKey(0)
        cv2.destroyAllWindows()

        rects = []
        for contour in contours:
                approx = cv2.convexHull(contour)
                rect = cv2.boundingRect(approx) # x,y,w,h
                rects.append(rect)
        pp.pprint( rects )

        biggest_rect        = getBiggestRect( rects )

        center_x        = biggest_rect[0] + biggest_rect[2]/2
        center_y        = biggest_rect[1] + biggest_rect[3]/2

        image = cv2.imread('001.png')
        cv2.rectangle(image, (biggest_rect[0], biggest_rect[1]), (biggest_rect[0]+biggest_rect[2], biggest_rect[1]+biggest_rect[3]), (0, 0, 255), 1[f:id:pongsuke:20170130171525p:plain])
        cv2.line(image, (center_x, 0), (center_x, height), (0, 0, 255)) # Draw Red Line
        cv2.line(image, (0, center_y), (width, center_y), (0, 0, 255)) # Draw Red Line
        cv2.imshow('Line', image)
#       cv2.imwrite("Line.png", image);
        cv2.moveWindow("Line", 10, 50);
        cv2.waitKey(0)
        cv2.destroyAllWindows()

def getBiggestRect( rects ):
        pre_area        = 0
        biggest_index   = 0
        for i, rect in enumerate(rects):
                area    = rect[2] * rect[3]
                if area > pre_area:
                        pre_area        = area
                        biggest_index   = i
        return rects[biggest_index]

if __name__ == '__main__':
        try:
                main()
        except KeyboardInterrupt:
                sys.exit(0)
実行結果
オリジナルの画像(風景写真に、青の丸を3つ書き込んであります。)
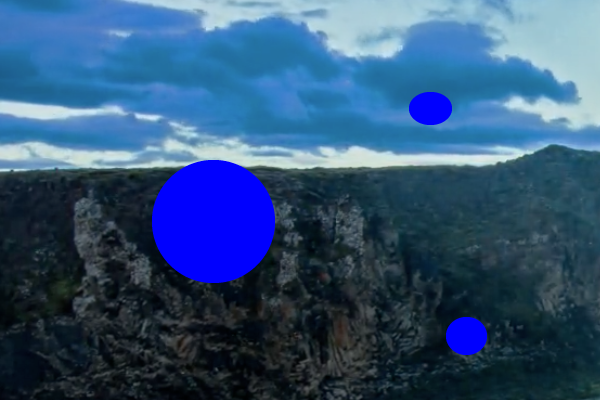
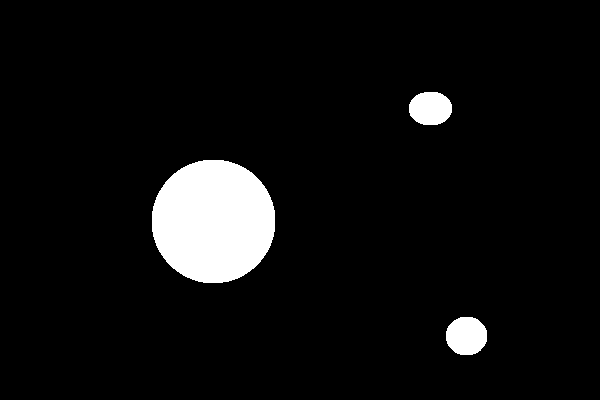
青とそれ以外の2値化後
contours
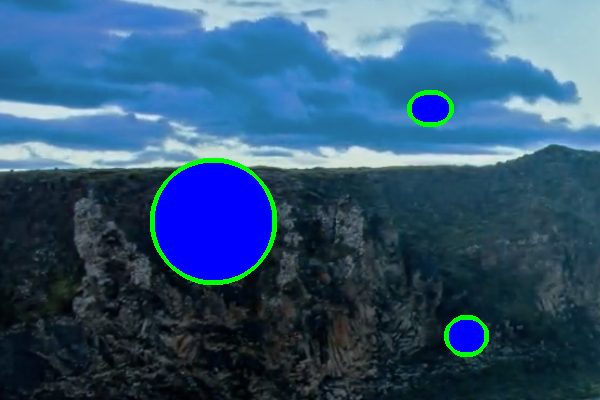
一番大きな四角を拾う
opencv と ウェブカメラ
緑で2値化して、輪郭抽出して、1番大きな四角で囲みます。
#!/usr/bin/python
# coding: utf-8

import sys
import cv2
import numpy as np
import pprint as pp

cap = cv2.VideoCapture(0)

def capture_camera():
        green_min = np.array([40, 70, 70], np.uint8)
        green_max = np.array([80, 255, 255], np.uint8)
        while True:
                ret, frame = cap.read()


                # 2値化
                image_hsv = cv2.cvtColor(frame, cv2.COLOR_BGR2HSV)      # HSV, range of Hue is 0-180
                h = image_hsv[:, :, 0]
                s = image_hsv[:, :, 1]
                v = image_hsv[:, :, 2]
                width   = h[0,:].size
                height  = h[:,0].size
#               print( 'width %s, height %s' % (width, height) )

                threshold_green_img = cv2.inRange(image_hsv, green_min, green_max)
                # 輪郭抽出
                contours, hierarchy = cv2.findContours(threshold_green_img,cv2.RETR_TREE,cv2.CHAIN_APPROX_SIMPLE)
#               pp.pprint( contours )

                cv2.drawContours(frame, contours, -1, (0,255,0), 3)

                if len(contours) > 0 :
                        rects = []
                        for contour in contours:
                                approx = cv2.convexHull(contour)
                                rect = cv2.boundingRect(approx) # x,y,w,h
                                rects.append(rect)
                        pp.pprint( len(rects) )
                        max_rect        = getBiggestRect( rects )
                        center_x        = max_rect[0] + max_rect[2]/2
                        center_y        = max_rect[1] + max_rect[3]/2
                        # 囲む
                        cv2.rectangle(frame, (max_rect[0], max_rect[1]), (max_rect[0]+max_rect[2], max_rect[1]+max_rect[3]), (0, 0, 255), 3)
                        # 線を引く
                        cv2.line(frame, (center_x, 0), (center_x, height), (0, 0, 255)) # Draw Red Line
                        cv2.line(frame, (0, center_y), (width, center_y), (0, 0, 255)) # Draw Red Line

                cv2.imshow('threshold_green_img', frame)

                #frameを表示
                #cv2.imshow('camera capture', frame)

                #10msecキー入力待ち
                k = cv2.waitKey(10)
                #Escキーを押されたら終了
                if k == 27:
                        break

def getBiggestRect( rects ):
        pre_area        = 0
        biggest_index   = 0
        for i, rect in enumerate(rects):
                area    = rect[2] * rect[3]
                if area > pre_area:
                        pre_area        = area
                        biggest_index   = i
        return rects[biggest_index]


if __name__ == '__main__':
        try:
                while True:
                        capture_camera()
                        break

        except KeyboardInterrupt:
                        pass

#キャプチャを終了
cap.release()
cv2.destroyAllWindows()
実行
