Raspberry pi でロボットアームを動かす その8 別マシンから動画ストリームを使う
ロボットアームを制御している(直結してある)ラズパイ以外で、映像を取得したい。
どうやったら簡単に実現できるか。
Opencv 2.4.8 でやる
別のubuntu マシンの Python プログラムからロボットアームの映像を取得してみる。
まず、入っている opencv のバージョンを確認してみる。
$ python
Python 2.7.6 (default, Oct 26 2016, 20:30:19)
[GCC 4.8.4] on linux2
Type "help", "copyright", "credits" or "license" for more information.
>>> import cv2
>>> cv2.__version__
'2.4.8'
2.4.8 だ。
API を確認する。
Reading and Writing Images and Video — OpenCV 2.4.8.0 documentation
Python: cv2.VideoCapture() →
Parameters: filename – name of the opened video file (eg. video.avi) or image sequence (eg. img_%02d.jpg, which will read samples like img_00.jpg, img_01.jpg, img_02.jpg, …) device – id of the opened video capturing device (i.e. a camera index). If there is a single camera connected, just pass 0.
ということで、ダイレクトにURLを指定はでき無さそう。
ということで、2種類の書き方を探せた。
Opencv 2.4.8 ストリームで、終了記号を探す方法?
#!/usr/bin/env python
# -*- coding: UTF-8 -*-

import cv2
import urllib
import numpy as np

stream=urllib.urlopen('http://192.168.100.86:8080/?action=stream')
bytes=''
while True:
    bytes+=stream.read(16384)
    a = bytes.find('\xff\xd8')
    b = bytes.find('\xff\xd9')
    if a!=-1 and b!=-1:
        jpg = bytes[a:b+2]
        bytes= bytes[b+2:]
        i = cv2.imdecode(np.fromstring(jpg, dtype=np.uint8),cv2.CV_LOAD_IMAGE_COLOR)
        cv2.imshow('i',i)
        if cv2.waitKey(30) & 0xFF == ord('q'):
            exit(0)
Opencv 2.4.8 画像を取得し続ける方法
#!/usr/bin/env python
# -*- coding: UTF-8 -*-
import base64
import time
import urllib2

import cv2
import numpy as np

req = urllib2.Request('http://192.168.100.86:8080/?action=snapshot');
while True:
        response = urllib2.urlopen(req)
        img_array = np.asarray(bytearray(response.read()), dtype=np.uint8)
        frame = cv2.imdecode(img_array, 1)

        cv2.imshow('frame', frame)
        if cv2.waitKey(30) & 0xFF == ord('q'):
                break
opencv 3.2
APIがことなる。
OpenCV: cv::VideoCapture Class Reference
§ VideoCapture() [2/4]
cv::VideoCapture::VideoCapture  (   const String &  filename    )
Open video file or a capturing device or a IP video stream for video capturing.

This is an overloaded member function, provided for convenience. It differs from the above function only in what argument(s) it accepts. Same as VideoCapture(const String& filename, int apiPreference) but using default Capture API backends
とのことで、いかにも直接 URL を指定できそうだ。
※未確認※
Raspberry pi zero w を動かす
手元に Raspberry pi zero w が届いたので、OSを入れて動かしてみます。


OS
RASPBIAN JESSIE LITE の Release date:2017-03-02 を入れてみます。
SDformatter でフォーマットして、 lite を win32diskimager で焼きます。
初期設定
とりあえず、USBから有線LANを繋いで、rpi-update をインストールして、ファームウェアをアップデートして、再起動。
Wifi設定
上記記事に従う。
ifconfig から、 wlan0 が有ることを確認する。
wpa_passphrase コマンドで wifi 設定をする。
接続を確認できた。
日本語化
jfbterm は、ログアウトする際にフリーズする。
fbterm を入れる。
fbterm -s 20 など
補足
バンドルされていたマイクロSDに、Noobsが入っていたので、試しに起動した所、当初、 Wifiの設定等々が出てきませんでした。
そこで、rpi-update して、再起動したら、 Wifi の設定が出てきました。
USBシリアル通信を試す
何かの役に立つかもしれないから、シリアル通信に挑戦してみる。
Pi Zero をつかいました。
Raspberry pi の設定
raspi-config から、シリアルログインをONにします。
5 Interfacing Options > P6 Serial で、 ON にします。
配線
物理的につなぎます。
ケーブルその1
まず、手元に有ったこのケーブルで試しました。

赤5V、黒GND、緑Tx(3.3V)、白Rx(3.3V)
私の場合は、電源は別途供給していたので、 赤は繋がず、
| ケーブル | RPI |
|---|---|
| GND | GND |
| 緑Tx | UART_RXD |
| 白Rx | UART_TXD |
につなぎました。
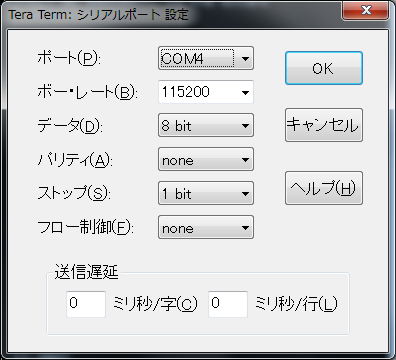
PCにUSBをさして、teraTermで、COOM4指定して、、、

Rpi Boot…
文字化けする・・・
ケーブルその2
つぎに、同じく、いつかかったこれを使ってみた。
(多分これ・・・)
| アダプタ | RPI |
|---|---|
| GND | GND |
| Tx | UART_RXD |
| Rx | UART_TXD |


成功した!
圧力センサー FSR406 を試す
FSR406 と ADコンバーター MCP3008


配線
FSR406 が、圧力によって変化するタイプのスイッチ的な性格なので、プルダウン抵抗的な配線にする、、、のだと思います。
皆様の例に習いました。
抵抗が CH0(1) と Vdd(16) を繋いでいます。
MCP3008 Vdd(16), Vref(15) > RPI 3.3v
MCP3008 AGND(14),DGND(9)   > RPI GND

MCP3008 CLK(13)     > RPI GPIO 11 (SCLK)
MCP3008 DOUT(12)    > RPI GPIO 9 (MISO)
MCP3008 DIN(11)     > RPI GPIO 10 (MOSI)
MCP3008 CS/SHDN(10) > RPI GPIP 8 (CE0)

MCP3008 CH0(1) > RPI GPIP 8 (CE0)
に配線します。
コーディング
#!/usr/bin/env python
# -*- coding: utf-8 -*-

import time
import sys
import spidev

spi = spidev.SpiDev()
spi.open(0,0)

def readAdc(channel):
        adc = spi.xfer2([1,(8+channel)<<4,0])
        data = ((adc[1]&3) << 8) + adc[2]
        return data

def convertVolts(data):
        volts = (data * 3.3) / float(1023)
        volts = round(volts,4)
        return volts

def convertPressure(data):
        pressure = 1023 - data
        return pressure

if __name__ == '__main__':
        try:
                while True:
                        data = readAdc(0)
                        volts = convertVolts(data)
                        pressure        = convertPressure(data)
                        print("adc: {:4}, volts : {:.2f}, pressure : {:.2f}".format(data, volts, pressure))

                        time.sleep(1)

        except KeyboardInterrupt:
                pass

spi.close()
sys.exit(0)
接触を感知できれば何でも良かったので、面積の大きい FSR406 を購入したのですが、重さへの演算は、出来ないタイプのセンサーだと思う。
どのような仕組みで抵抗が変わるのか調べていませんが、分銅の置き方で数値が変わります。
Raspberry pi でロボットアームを動かす その7 カメラモジュールv2に変更
カメラを、WEBカメラからカメラモジュールv2に変更しました。
それにともなってコードも少しだけ変わりました。
コーディング
#!/usr/bin/python
# coding: utf-8

import sys
import io
import cv2
import numpy as np
import pprint as pp
import picamera

def capture_camera():
        blue_min = np.array([110, 100, 100], np.uint8)
        blue_max = np.array([140, 255, 255], np.uint8)
        green_min = np.array([40, 70, 70], np.uint8)
        green_max = np.array([80, 255, 255], np.uint8)

        with picamera.PiCamera() as camera:
                camera.hflip = True
                camera.vflip = True
                camera.resolution = (640, 480)
                camera.framerate = 10
                stream = io.BytesIO()

                while True:
                        camera.capture(stream, format="jpeg", use_video_port=True)
                        frame = np.fromstring(stream.getvalue(), dtype=np.uint8)
                        stream.seek(0)
                        frame = cv2.imdecode(frame, 1)

                        # 2値化
                        image_hsv = cv2.cvtColor(frame, cv2.COLOR_BGR2HSV)      # HSV, range of Hue is 0-180
                        h = image_hsv[:, :, 0]
                        s = image_hsv[:, :, 1]
                        v = image_hsv[:, :, 2]
                        width   = h[0,:].size
                        height  = h[:,0].size
#                       print( 'width %s, height %s' % (width, height) )

                        threshold_green_img = cv2.inRange(image_hsv, green_min, green_max)
                        # 輪郭抽出
                        contours, hierarchy = cv2.findContours(threshold_green_img,cv2.RETR_TREE,cv2.CHAIN_APPROX_SIMPLE)
#                       pp.pprint( contours )

                        cv2.drawContours(frame, contours, -1, (0,255,0), 3)

                        if len(contours) > 0 :
                                rects = []
                                for contour in contours:
                                        approx = cv2.convexHull(contour)
                                        rect = cv2.boundingRect(approx) # x,y,w,h
                                        rects.append(rect)
                                pp.pprint( len(rects) )
                                max_rect        = getBiggestRect( rects )
                                center_x        = max_rect[0] + max_rect[2]/2
                                center_y        = max_rect[1] + max_rect[3]/2
                                # 囲む
                                cv2.rectangle(frame, (max_rect[0], max_rect[1]), (max_rect[0]+max_rect[2], max_rect[1]+max_rect[3]), (0, 0, 255), 3)
                                # 線を引く
                                cv2.line(frame, (center_x, 0), (center_x, height), (0, 0, 255)) # Draw Red Line
                                cv2.line(frame, (0, center_y), (width, center_y), (0, 0, 255)) # Draw Red Line

                        cv2.imshow('threshold_green_img', frame)

                        #frameを表示
                        #cv2.imshow('camera capture', frame)

                        #10msecキー入力待ち
                        k = cv2.waitKey(10)
                        #Escキーを押されたら終了
                        if k == 27:
                                break

def getBiggestRect( rects ):
        pre_area        = 0
        biggest_index   = 0
        for i, rect in enumerate(rects):
                area    = rect[2] * rect[3]
                if area > pre_area:
                        pre_area        = area
                        biggest_index   = i
        return rects[biggest_index]

if __name__ == '__main__':
        try:
                while True:
                        capture_camera()
                        break

        except KeyboardInterrupt:
                        pass

#キャプチャを終了
cv2.destroyAllWindows()
実行

Raspberry pi でロボットアームを動かす その6 ゲームパッドで動かせるようにする
微調整の際に役立ちそうなので、ゲームパッドでアームを動かせるようにしておきます。

また、激しく揺れるので、MDFにネジ止めしました。
動作確認
$ lsusb
Bus 001 Device 006: ID 046d:082c Logitech, Inc.
Bus 001 Device 005: ID 0079:0011 DragonRise Inc. Gamepad
Bus 001 Device 003: ID 0424:ec00 Standard Microsystems Corp. SMSC9512/9514 Fast Ethernet Adapter
Bus 001 Device 002: ID 0424:9514 Standard Microsystems Corp.
Bus 001 Device 001: ID 1d6b:0002 Linux Foundation 2.0 root hub
DragonRise Inc. Gamepad と認識されています。
スクリプトその1 pygame
以下を使用させていただきました。
ドキュメントはこっち。 pygame.joystick — Pygame v1.9.2 documentation
SSHから起動すると pygame.error: video system not initialized と吐きますので、リモートデスクトップから起動しました。
動作チェック
で、実際に触ってみたら・・・
x and y : 0.999969482422 , 0.0
x and y : 0.0 , 0.0
と出ました。
押すのと、離すのとで、アクションです。
ボタンは、y, x, b, a, L, R, SELECT, START が、 0~7 に対応していました。
thread
ここでつまりました。
thread 作成が出来ないわけでもないし、動かないわけでもないのですが、なにか、main thread の影響がサブスレッドに出ているような挙動をします。
pygameのドキュメントlをちゃんと読めば分かるのかもしれませんが、pygame必須ではないので、別の方法を探ります。
コーディングその2 evdev
libpython-dev をインストールしてから、
$ pip install evdev
私の場合は、0にWEBカメラが刺さってますので、1を使用しています。
#!/usr/bin/python
#coding: utf-8

import evdev

devices = [evdev.InputDevice(fn) for fn in evdev.list_devices()]
for device in devices:
        print(device.fn, device.name, device.phys)

device = evdev.InputDevice('/dev/input/event1')
print(device)
for event in device.read_loop():
        if event.type == evdev.ecodes.EV_KEY:
                print(evdev.util.categorize(event))
実行
$ ./evdev_test.py
('/dev/input/event0', 'HD Webcam C615', 'usb-3f980000.usb-1.4/button')
('/dev/input/event1', 'USB Gamepad ', 'usb-3f980000.usb-1.2/input0')
device /dev/input/event1, name "USB Gamepad ", phys "usb-3f980000.usb-1.2/input0"
key event at 1485825399.515801, 288 (['BTN_JOYSTICK', 'BTN_TRIGGER']), down
key event at 1485825399.667815, 288 (['BTN_JOYSTICK', 'BTN_TRIGGER']), up
key event at 1485825399.891846, 289 (BTN_THUMB), down
key event at 1485825400.019861, 289 (BTN_THUMB), up
key event at 1485825400.235895, 290 (BTN_THUMB2), down
key event at 1485825400.371904, 290 (BTN_THUMB2), up
key event at 1485825400.587932, 291 (BTN_TOP), down
key event at 1485825400.739953, 291 (BTN_TOP), up
key event at 1485825402.404162, 292 (BTN_TOP2), down
key event at 1485825402.468181, 292 (BTN_TOP2), up
key event at 1485825402.796214, 293 (BTN_PINKIE), down
key event at 1485825402.924227, 293 (BTN_PINKIE), up
key event at 1485825403.364283, 294 (BTN_BASE), down
key event at 1485825403.476296, 294 (BTN_BASE), up
key event at 1485825403.732329, 295 (BTN_BASE2), down
key event at 1485825403.884350, 295 (BTN_BASE2), up
扱いやす形式で得る。
#!/usr/bin/python
#coding: utf-8

import sys
import evdev

devices = [evdev.InputDevice(fn) for fn in evdev.list_devices()]
for device in devices:
        print(device.fn, device.name, device.phys)

def main():
        device = evdev.InputDevice('/dev/input/event1')
        print(device)
        for event in device.read_loop():
                # event : code sec timestamp() type usec value
                if event.type == evdev.ecodes.EV_KEY:
                        print("{} {} {}".format(event.timestamp(), event.code, event.value))
                elif event.type == evdev.ecodes.EV_ABS:
                        print("{} {} {}".format(event.timestamp(), event.code, event.value))

if __name__ == '__main__':
        try:
                main()
        except KeyboardInterrupt:
                pass

print("\n")
sys.exit()
スレッドテスト
テストした所、スレッドも普通に動いたようです。
コーディング
#!/usr/bin/python
#coding: utf-8

import sys
import time
import threading
import Adafruit_PCA9685
import evdev

devices = [evdev.InputDevice(fn) for fn in evdev.list_devices()]
for device in devices:
        print(device.fn, device.name, device.phys)

class MyThread(threading.Thread):
        def __init__(self):
                threading.Thread.__init__(self)
                self.channel    = 0
                self.FLAG_MOVE  = False
                self.DIRECTION  = 0
                # PCA9685 チャンネルに合わせる
                self.PWM_NUMS   = [375,375,150,375,275] # 初期値
                self.MINS               = [150,200,150,150,260] # 最小値
                self.MAXS               = [600,500,600,600,380] # 最大値
                self.pwm                = Adafruit_PCA9685.PCA9685()
                self.pwm.set_pwm_freq(60)
                self.set2def()

        def set2def(self):
                self.pwm.set_pwm(0, 0, self.PWM_NUMS[0])
                self.pwm.set_pwm(1, 0, self.PWM_NUMS[1])
                self.pwm.set_pwm(2, 0, self.PWM_NUMS[2])
                self.pwm.set_pwm(3, 0, self.PWM_NUMS[3])
                self.pwm.set_pwm(4, 0, self.PWM_NUMS[4])

        def run(self):
                print("  === start sub thread ===")

                while True:
                        while self.FLAG_MOVE:
                                if self.DIRECTION == 1 and self.PWM_NUMS[self.channel] < self.MAXS[self.channel]:
                                        self.PWM_NUMS[self.channel] += 1
                                elif self.DIRECTION == -1 and self.PWM_NUMS[self.channel] > self.MINS[self.channel]:
                                        self.PWM_NUMS[self.channel] -= 1
                                self.pwm.set_pwm(self.channel, 0, self.PWM_NUMS[self.channel])
                                print("Thread {}. {} {}".format(self.channel, self.DIRECTION, self.PWM_NUMS[self.channel]))
                                time.sleep(0.01)

                print("  === end sub thread ===")

def main():
        th = MyThread()
        th.setDaemon(True)
        th.start()

        device = evdev.InputDevice('/dev/input/event1')
        print(device)
        for event in device.read_loop():
                # event : code sec timestamp() type usec value
                if event.type == evdev.ecodes.EV_KEY:
                        print("{} {} {}".format(event.timestamp(), event.code, event.value))
                        if event.code == 290:           # Bボタン
                                th.channel      = 2                     # MG996R 傾き:上
                                if event.value == 0:
                                        th.FLAG_MOVE    = False
                                        th.DIRECTION    = 0
                                elif event.value == 1:
                                        th.FLAG_MOVE    = True
                                        th.DIRECTION    = -1

                        elif event.code == 291:         # Aボタン
                                th.channel      = 2                     # MG996R 傾き:上
                                if event.value == 0:
                                        th.FLAG_MOVE    = False
                                        th.DIRECTION    = 0
                                elif event.value == 1:
                                        th.FLAG_MOVE    = True
                                        th.DIRECTION    = 1

                        elif event.code == 292:         # Lボタン
                                th.channel      = 3                     # MG996R 手首旋回
                                if event.value == 0:
                                        th.FLAG_MOVE    = False
                                        th.DIRECTION    = 0
                                elif event.value == 1:
                                        th.FLAG_MOVE    = True
                                        th.DIRECTION    = -1

                        elif event.code == 293:         # Rボタン
                                th.channel      = 3                     # MG996R 手首旋回
                                if event.value == 0:
                                        th.FLAG_MOVE    = False
                                        th.DIRECTION    = 0
                                elif event.value == 1:
                                        th.FLAG_MOVE    = True
                                        th.DIRECTION    = 1

                        elif event.code == 288:         # Xボタン
                                th.channel      = 4                     # MG996R ハンド
                                if event.value == 0:
                                        th.FLAG_MOVE    = False
                                        th.DIRECTION    = 0
                                elif event.value == 1:
                                        th.FLAG_MOVE    = True
                                        th.DIRECTION    = 1

                        elif event.code == 289:         # Yボタン
                                th.channel      = 4                     # MG996R ハンド
                                if event.value == 0:
                                        th.FLAG_MOVE    = False
                                        th.DIRECTION    = 0
                                elif event.value == 1:
                                        th.FLAG_MOVE    = True
                                        th.DIRECTION    = -1

                elif event.type == evdev.ecodes.EV_ABS:
                        print("{} {} {}".format(event.timestamp(), event.code, event.value))

                        if event.code == 0:     # X軸,左右
                                th.channel      = 0     # 旋回
                                if event.value == 0:
                                        th.FLAG_MOVE    = True
                                        th.DIRECTION    = 1
                                elif event.value == 127:
                                        th.FLAG_MOVE    = False
                                        th.DIRECTION    = 0
                                elif event.value == 255:
                                        th.FLAG_MOVE    = True
                                        th.DIRECTION    = -1

                        elif event.code == 1:   # y軸,上下
                                th.channel      = 1     # 傾き:下
                                if event.value == 0:
                                        th.FLAG_MOVE    = True
                                        th.DIRECTION    = 1
                                elif event.value == 127:
                                        th.FLAG_MOVE    = False
                                        th.DIRECTION    = 0
                                elif event.value == 255:
                                        th.FLAG_MOVE    = True
                                        th.DIRECTION    = -1

if __name__ == '__main__':
        try:
                main()
        except KeyboardInterrupt:
                pass

print("\n")
sys.exit()
なお、このままですと、サブスレッドの終了には到達しません。
また、多軸を同時に制御できるようにもしていません。
ちょっと改善?
パッドの入力を同時に複数箇所受け取れるようにします。
はじめ、軸ごとにスレッドを立ててみたのですが、変に動きが遅かったので、なんかかっこ悪いですが、スレッドは1つで、一回のループの中で5つのモータのフラグを順繰りで読み取り制御させるようにしました。
なので、正確には同時に2箇所の制御はしておらず、高速に順番に動かしているだけです。
#!/usr/bin/python
#coding: utf-8

import sys
import time
import threading
import Adafruit_PCA9685
import evdev

devices = [evdev.InputDevice(fn) for fn in evdev.list_devices()]
for device in devices:
        print(device.fn, device.name, device.phys)

class MyThread(threading.Thread):
        def __init__(self):
                threading.Thread.__init__(self)
                # PCA9685 チャンネルに合わせる
                self.CHANNELS   = [0,1,2,3,4]
                self.FLAG_MOVES = [False,False,False,False,False]
                self.DIRECTIONS = [0,0,0,0,0]
                self.PWM_NUMS   = [375,375,150,375,275] # 初期値
                self.MINS               = [150,200,150,150,260] # 最小値
                self.MAXS               = [600,500,600,600,380] # 最大値
                self.pwm                = Adafruit_PCA9685.PCA9685()
                self.pwm.set_pwm_freq(60)
                self.set2def()

        def set2def(self):
                self.pwm.set_pwm(0, 0, self.PWM_NUMS[0])
                self.pwm.set_pwm(1, 0, self.PWM_NUMS[1])
                self.pwm.set_pwm(2, 0, self.PWM_NUMS[2])
                self.pwm.set_pwm(3, 0, self.PWM_NUMS[3])
                self.pwm.set_pwm(4, 0, self.PWM_NUMS[4])

        def run(self):
                print("MyThread start.")

                while True:
                        for channel in self.CHANNELS:
                                if self.FLAG_MOVES[channel] and self.DIRECTIONS[channel] == 1 and self.PWM_NUMS[channel] < self.MAXS[channel]:
                                        self.PWM_NUMS[channel] += 1
                                elif self.FLAG_MOVES[channel] and self.DIRECTIONS[channel] == -1 and self.PWM_NUMS[channel] > self.MINS[channel]:
                                        self.PWM_NUMS[channel] -= 1
                                self.pwm.set_pwm(channel, 0, self.PWM_NUMS[channel])
#                               print("Thread:moves {}. {} {}".format(channel, self.DIRECTIONS[channel], self.PWM_NUMS[channel]))
#                               time.sleep(0.01)

                print("MyThread end.")

def main():
        th = MyThread()
        th.setDaemon(True)
        th.start()

        device = evdev.InputDevice('/dev/input/event0')
        print(device)
        for event in device.read_loop():
                # event : code sec timestamp() type usec value
                if event.type == evdev.ecodes.EV_KEY:
                        print("{} {} {}".format(event.timestamp(), event.code, event.value))
                        if event.code == 290:           # Bボタン
                                channel = 2                     # MG996R 傾き:上
                                if event.value == 0:
                                        th.FLAG_MOVES[channel]  = False
                                        th.DIRECTIONS[channel]  = 0
                                elif event.value == 1:
                                        th.FLAG_MOVES[channel]  = True
                                        th.DIRECTIONS[channel]  = -1

                        elif event.code == 291:         # Aボタン
                                channel = 2                     # MG996R 傾き:上
                                if event.value == 0:
                                        th.FLAG_MOVES[channel]  = False
                                        th.DIRECTIONS[channel]  = 0
                                elif event.value == 1:
                                        th.FLAG_MOVES[channel]  = True
                                        th.DIRECTIONS[channel]  = 1

                        elif event.code == 292:         # Lボタン
                                channel = 3                     # MG996R 手首旋回
                                if event.value == 0:
                                        th.FLAG_MOVES[channel]  = False
                                        th.DIRECTIONS[channel]  = 0
                                elif event.value == 1:
                                        th.FLAG_MOVES[channel]  = True
                                        th.DIRECTIONS[channel]  = -1

                        elif event.code == 293:         # Rボタン
                                channel = 3                     # MG996R 手首旋回
                                if event.value == 0:
                                        th.FLAG_MOVES[channel]  = False
                                        th.DIRECTIONS[channel]  = 0
                                elif event.value == 1:
                                        th.FLAG_MOVES[channel]  = True
                                        th.DIRECTIONS[channel]  = 1

                        elif event.code == 288:         # Xボタン
                                channel = 4                     # MG996R ハンド
                                if event.value == 0:
                                        th.FLAG_MOVES[channel]  = False
                                        th.DIRECTIONS[channel]  = 0
                                elif event.value == 1:
                                        th.FLAG_MOVES[channel]  = True
                                        th.DIRECTIONS[channel]  = 1

                        elif event.code == 289:         # Yボタン
                                channel = 4                     # MG996R ハンド
                                if event.value == 0:
                                        th.FLAG_MOVES[channel]  = False
                                        th.DIRECTIONS[channel]  = 0
                                elif event.value == 1:
                                        th.FLAG_MOVES[channel]  = True
                                        th.DIRECTIONS[channel]  = -1

                elif event.type == evdev.ecodes.EV_ABS:
                        print("{} {} {}".format(event.timestamp(), event.code, event.value))

                        if event.code == 0:     # X軸,左右
                                channel = 0     # 旋回
                                if event.value == 0:
                                        th.FLAG_MOVES[channel]  = True
                                        th.DIRECTIONS[channel]  = 1
                                elif event.value == 127:
                                        th.FLAG_MOVES[channel]  = False
                                        th.DIRECTIONS[channel]  = 0
                                elif event.value == 255:
                                        th.FLAG_MOVES[channel]  = True
                                        th.DIRECTIONS[channel]  = -1

                        elif event.code == 1:   # y軸,上下
                                channel = 1     # 傾き:下
                                if event.value == 0:
                                        th.FLAG_MOVES[channel]  = True
                                        th.DIRECTIONS[channel]  = 1
                                elif event.value == 127:
                                        th.FLAG_MOVES[channel]  = False
                                        th.DIRECTIONS[channel]  = 0
                                elif event.value == 255:
                                        th.FLAG_MOVES[channel]  = True
                                        th.DIRECTIONS[channel]  = -1

if __name__ == '__main__':
        try:
                main()
        except KeyboardInterrupt:
                pass

print("\n")
sys.exit()
Raspberry pi でロボットアームを動かす その5 ウェブカメラと画像解析
アームの先端にWEBカメラを付けて、認識させてみる
まず、動作確認その他めのために、Displayを取得したい。
X11VNC でリモートデスクトップ
最初 xrdp でリモートデスクトップ接続していたのですが、Xlib: extension “RANDR” missing on display “:1.0” とでて、対処の仕方がわからなかったので、X11VNC に切り替えました。
画面に出ている映像を取得する感じなので、自動で xwindow まで到達させておきます。
/etc/lightdm/lightdm.conf で、ログインさせておきたいユーザーを指定。
解像度指定
/boot/config.txt frambebuffer の2行。
$ sudo apt-get install x11vnc
$ x11vnc
ポートが出るので、わかりますが、初回なら 5900 でしょう。
一旦切断?した後、再度接続する際には、
$ x11vnc
します。
x11vnc 自動起動
cat .config/autostart/x11vnc.desktop
[Desktop Entry]
Encoding=UTF-8
Type=Application
Name=X11VNC
Comment=X11VNC
Exec=x11vnc
StartupNortify=false
Terminal=false
Hidden=false
opencv のインストール
$ sudo apt-get install libopencv-dev
$ sudo apt-get install python-opencv
opencv のテスト
適当な画像を読み込んで、処理して、x-window に window を出すテストを行う。
realvnc などで、接続しておく。
RBG を HSV に変換 & 2値化
境界線の抽出
OpenCV: Contours : Getting Started
コーディング
contour が複数ある際にどうするかですが、今回は単純に一番大きな四角だけを拾うようにしました。
#!/usr/bin/env python
# -*- coding: utf-8 -*
import sys
import cv2
import numpy as np
import pprint as pp

def main():
        image = cv2.imread('001.png')
        cv2.namedWindow("original");
        cv2.moveWindow("original", 10, 50);
        cv2.imshow('original', image)
        cv2.waitKey(0)
        cv2.destroyAllWindows()

        image_hsv = cv2.cvtColor(image, cv2.COLOR_BGR2HSV)      # HSV, range of Hue is 0-180
        #image_hsv = cv2.cvtColor(image, cv2.COLOR_BGR2HSV_FULL)        # HSV_FULL, range of Hue is 0-360
#       pp.pprint(image_hsv)

        h = image_hsv[:, :, 0]
        s = image_hsv[:, :, 1]
        v = image_hsv[:, :, 2]

        width   = h[0,:].size
        height  = h[:,0].size
        print( 'width %s, height %s' % (width, height) )

        blue_min = np.array([110, 100, 100], np.uint8)
        blue_max = np.array([140, 255, 255], np.uint8)
        threshold_blue_img = cv2.inRange(image_hsv, blue_min, blue_max)

        cv2.namedWindow("threshold_blue_img");
        cv2.moveWindow("threshold_blue_img", 10, 50);
        cv2.imshow('threshold_blue_img', threshold_blue_img)
#       cv2.imwrite("threshold_blue_img.png", threshold_blue_img);
        cv2.waitKey(0)
        cv2.destroyAllWindows()

#       pp.pprint(threshold_blue_img)
        contours,hierarchy = cv2.findContours(threshold_blue_img,cv2.RETR_TREE,cv2.CHAIN_APPROX_SIMPLE)
#       pp.pprint(contours)

        cv2.namedWindow("contours");
        cv2.moveWindow("contours", 10, 50);
        cv2.drawContours(image, contours,-1,(0,255,0),3)
        cv2.imshow('contours', image)
#       cv2.imwrite("contours.png", image);
        cv2.waitKey(0)
        cv2.destroyAllWindows()

        rects = []
        for contour in contours:
                approx = cv2.convexHull(contour)
                rect = cv2.boundingRect(approx) # x,y,w,h
                rects.append(rect)
        pp.pprint( rects )

        biggest_rect        = getBiggestRect( rects )

        center_x        = biggest_rect[0] + biggest_rect[2]/2
        center_y        = biggest_rect[1] + biggest_rect[3]/2

        image = cv2.imread('001.png')
        cv2.rectangle(image, (biggest_rect[0], biggest_rect[1]), (biggest_rect[0]+biggest_rect[2], biggest_rect[1]+biggest_rect[3]), (0, 0, 255), 1[f:id:pongsuke:20170130171525p:plain])
        cv2.line(image, (center_x, 0), (center_x, height), (0, 0, 255)) # Draw Red Line
        cv2.line(image, (0, center_y), (width, center_y), (0, 0, 255)) # Draw Red Line
        cv2.imshow('Line', image)
#       cv2.imwrite("Line.png", image);
        cv2.moveWindow("Line", 10, 50);
        cv2.waitKey(0)
        cv2.destroyAllWindows()

def getBiggestRect( rects ):
        pre_area        = 0
        biggest_index   = 0
        for i, rect in enumerate(rects):
                area    = rect[2] * rect[3]
                if area > pre_area:
                        pre_area        = area
                        biggest_index   = i
        return rects[biggest_index]

if __name__ == '__main__':
        try:
                main()
        except KeyboardInterrupt:
                sys.exit(0)
実行結果
オリジナルの画像(風景写真に、青の丸を3つ書き込んであります。)

青とそれ以外の2値化後

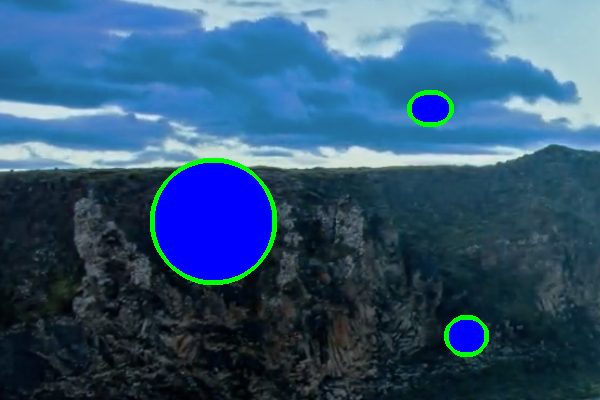
contours

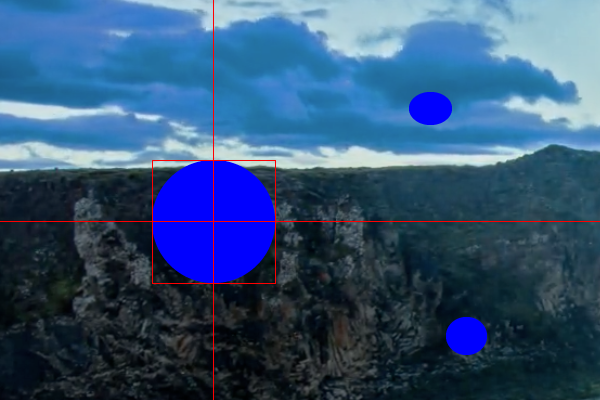
一番大きな四角を拾う

opencv と ウェブカメラ
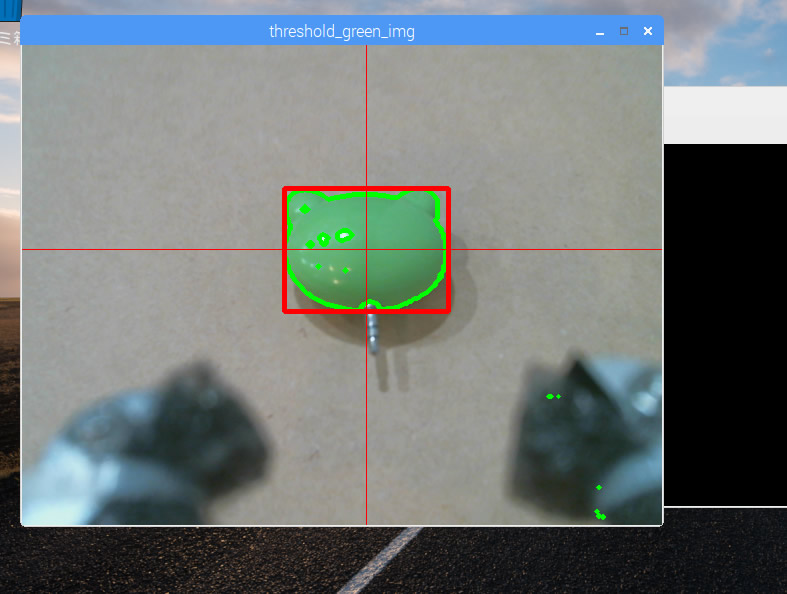
緑で2値化して、輪郭抽出して、1番大きな四角で囲みます。
#!/usr/bin/python
# coding: utf-8

import sys
import cv2
import numpy as np
import pprint as pp

cap = cv2.VideoCapture(0)

def capture_camera():
        green_min = np.array([40, 70, 70], np.uint8)
        green_max = np.array([80, 255, 255], np.uint8)
        while True:
                ret, frame = cap.read()


                # 2値化
                image_hsv = cv2.cvtColor(frame, cv2.COLOR_BGR2HSV)      # HSV, range of Hue is 0-180
                h = image_hsv[:, :, 0]
                s = image_hsv[:, :, 1]
                v = image_hsv[:, :, 2]
                width   = h[0,:].size
                height  = h[:,0].size
#               print( 'width %s, height %s' % (width, height) )

                threshold_green_img = cv2.inRange(image_hsv, green_min, green_max)
                # 輪郭抽出
                contours, hierarchy = cv2.findContours(threshold_green_img,cv2.RETR_TREE,cv2.CHAIN_APPROX_SIMPLE)
#               pp.pprint( contours )

                cv2.drawContours(frame, contours, -1, (0,255,0), 3)

                if len(contours) > 0 :
                        rects = []
                        for contour in contours:
                                approx = cv2.convexHull(contour)
                                rect = cv2.boundingRect(approx) # x,y,w,h
                                rects.append(rect)
                        pp.pprint( len(rects) )
                        max_rect        = getBiggestRect( rects )
                        center_x        = max_rect[0] + max_rect[2]/2
                        center_y        = max_rect[1] + max_rect[3]/2
                        # 囲む
                        cv2.rectangle(frame, (max_rect[0], max_rect[1]), (max_rect[0]+max_rect[2], max_rect[1]+max_rect[3]), (0, 0, 255), 3)
                        # 線を引く
                        cv2.line(frame, (center_x, 0), (center_x, height), (0, 0, 255)) # Draw Red Line
                        cv2.line(frame, (0, center_y), (width, center_y), (0, 0, 255)) # Draw Red Line

                cv2.imshow('threshold_green_img', frame)

                #frameを表示
                #cv2.imshow('camera capture', frame)

                #10msecキー入力待ち
                k = cv2.waitKey(10)
                #Escキーを押されたら終了
                if k == 27:
                        break

def getBiggestRect( rects ):
        pre_area        = 0
        biggest_index   = 0
        for i, rect in enumerate(rects):
                area    = rect[2] * rect[3]
                if area > pre_area:
                        pre_area        = area
                        biggest_index   = i
        return rects[biggest_index]


if __name__ == '__main__':
        try:
                while True:
                        capture_camera()
                        break

        except KeyboardInterrupt:
                        pass

#キャプチャを終了
cap.release()
cv2.destroyAllWindows()
実行
